This review will look at an interesting suite of products built around the innovative OBSBOT Tail Air. In previous articles like 2020’s All In on NDI, I discussed how NDI enables streaming producers to level up our productions. Now the OBSBOT Tail Air (Figure 1) has entered the NDI ecosystem. The individual cameras retail for $499, and OBSBOT lent Streaming Media three of them for this review, as well as a couple of accessories to show off how they can work together in a studio or field production.

Figure 1. The OBSBOT Tail Air PTZ camera
What sets the Tail Air apart from other similar-looking, NDI-supporting PTZ cameras? For one thing, the OBSBOT PTZs are considerably smaller, even though they also include microphones, Wi-Fi, some AI-driven intelligent tracking features, and an internal battery. While a typical PTZ is large and in charge, you could put the OBSBOT Tail Air in the center of a conference room table on a small tripod and pan it to follow the active speaker, and it wouldn’t draw a lot of attention to itself. Its size makes it a very discreet system. Coupled with the wireless connectivity and internal battery, it’s easy to drop three of them around a room with no wires.
The App
You control the Tail Air cameras with an app that’s available for iOS and Android. I used the Android version in testing. The cameras initially present themselves to the app via Bluetooth. They can then make a connection via their own Wi-Fi hotspot, or you can have them all connect via your own wireless or wired local area network.
Interestingly, the app does its connection business in vertical mode. Once connected, it changes to horizontal mode. If you need to switch between cameras, you’ll be constantly rotating your tablet from vertical to horizontal because you can only control one camera at a time in the app. There is no multi-camera app available from OBSBOT at this juncture. This cumbersome switching between devices can be really trying if you’re doing a multi-camera live shoot, which is commonly the case with PTZ producers.
At the top left of the main viewing area shown in Figure 2 is the house-shaped Home button that takes you back out to select a different camera. Clicking the next icon down takes you to your shot layout (see Figure 3). Here, you can see various shots that I have saved as my preset positions. If I tap on P2, the app will switch to that shot, making it the active camera.

Figure 2. The main viewing area of the OBSBOT app
Figure 3. The OBSBOT app’s shot layout
In the upper-left corner of the shot layout screen, you can see what’s currently “On Air.” To the immediate right of On Air is the Wide version of the same shot—a digital crop of the image off the sensor. To the right of the wide shot, the app shows me what it is auto-tracking in the currently selected shot.
If you don’t need to move the camera, you can outline several virtual crops from the wide shot and cut between them. While a real zoom adjustment would require optically zooming in and out between a close-up and wide shot, with the OBSBOT Studio app, you can use presets to cut between them, but only if no rotation or tilt is involved. Those physical motions still take time and actual camera adjustments.
If you exit the shot layout, you can access the first three presets with the P1, P2, and P3 buttons shown at the bottom of Figure 2. You can click those buttons to switch preset shots without leaving the main viewing area and cut to three different optical zooms from a single 4K image without making any physical adjustments to the camera.
Continuing down the left edge of the display, below the shot layout button, you can tap the next icon down to access your manual controls (see Figure 4). Running the camera in manual mode enables you to set your ISO, shutter speed, and EV compensation to bring it down a stop if the image is too bright. You can also switch to Auto mode to leave these adjustments to the Tail Air. I prefer to control these settings manually; in auto, I really don’t know what the camera is doing.

Figure 4. Manual camera controls
Below the EV button is Autofocus (AF-C). I kept that on continuously in the demo video that accompanies this article so that as I moved around, the camera would constantly refocus on me.
Next up are playback controls. This is for when you are streaming directly from the device and want to load media like an introductory video or a pre-show video and play it using the app. Down at the bottom left of Figure 2, you’ll see a button that looks like an ellipsis. This is for menu commands. Tapping that button brings up several menus that I’ll discuss later in the article.
AI
At the bottom left of Figure 2, you will see a button that you can tap to access AI settings, which allow you to select an object or face you want the Air Tail to track. Tapping the framed AI button brings up a bounding box that I can adjust to identify the object I want the camera to track (my face in Figure 5), and it will use that box to track this selected object in the frame. If I move left, it’s going to track me left, and if I move back, it’s going to track me back. If I move really fast, it’s going to fall behind.

Figure 5. Tracking an object and adjusting tracking speed
The dialog shown in Figure 5 is used to adjust the speed of your tracking. Standard speed is the default, but you can pick Slow if you don’t want it to be jerking around to track the subject. If you were shooting sports and wanted it to be able to move very fast, you would select the Fast setting. For most situations, Standard will strike a balance between being fast enough and not so jumpy that it’s trying to make 100 adjustments a second.
Lastly, you can use the AI features to adjust how the Air Tail frames the subject. Often, I see auto-tracking put a person’s head in the middle of the frame, and anyone trained in rule-of-thirds framing and minimizing headroom knows that’s just wrong. In Figure 6, my headroom is a little bit off. By sliding the yellow bar, I can adjust it to put my head closer to the top of the frame, instead of wasting all of the space above my head. This is the first AI-driven tracking system I’ve seen that actually allows me to correct how the AI does the cropping and adjust headroom properly or make sure a speaker’s hands are in the shot.
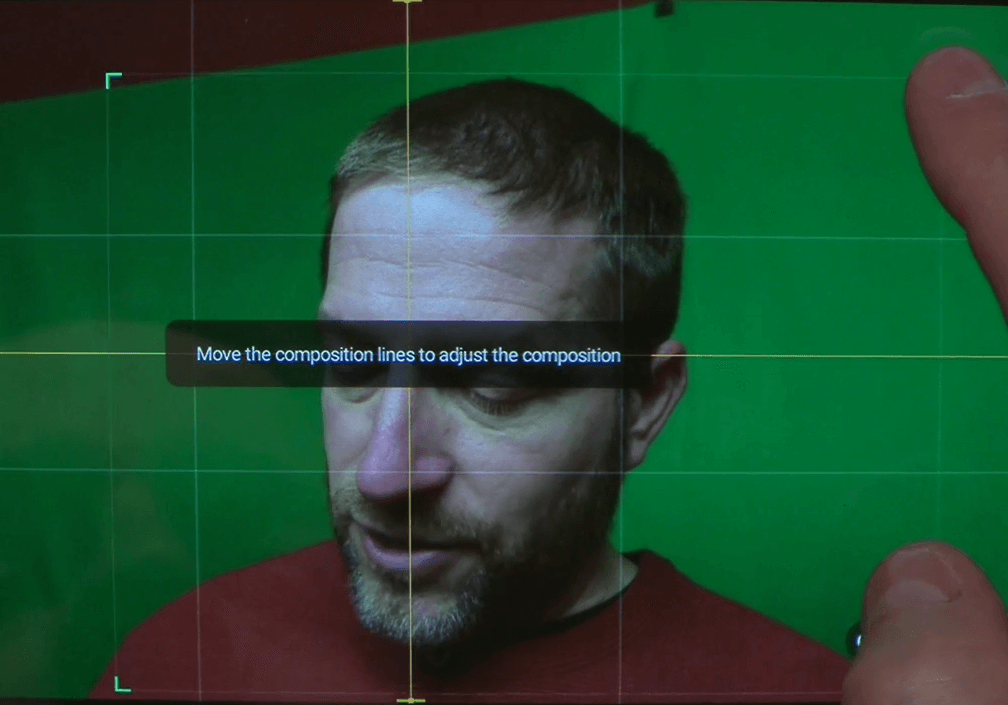
Figure 6. Adjusting auto-tracking framing to conserve headroom
Motion
Just to the right of the AI button along the panel at the bottom of the screen, you access the PTZ controls (see Figure 7). You’ll use these controls to manually move the camera around. You can tilt it up, tilt it down, crop (virtual zoom) the image, and save that position. I discussed this type of zooming at length in a review of the Mevo Start. This active mode lets you smoothly move your crop around the image just as if you were using a joystick or physical control. It’s possible to use this setting as a virtual camera operator.

Figure 7. On-screen PTZ controls
Next is the zoom control, which is also available when you’re in the PTZ area. This will go up to 4x. I have tested it, and it’s actually quite impressive. Remember that the camera is capturing 4K, and you will most likely be delivering 1080p HD, so a 2x crop is really a 1:1 pixel delivery. This means you’re not losing any information; you’re giving your audience pixel for pixel. Beyond that, you’re cropping into the image. But with today’s technology, it’s looking considerably better than digital zoom looked a few years back, and you’re limited to 2x, so it can’t get that bad.
Menus
Click the three dots in the lower-left corner of Figure 2, to open up the menu. There, you will see your battery level, recording status, Wi-Fi connection, Gesture Control settings, and mic selection, as well as Audio Settings, Face Auto Exposure, and more as you scroll down (see Figure 8).

Figure 8. The OBSBOT Studio menu of menus
By turning off Gesture Controls, you can ensure that the app or camera won’t react to a hand motion that wasn’t intended to make the camera do something. Companies love to talk about the intelligence of their AI capabilities, but the AI used in cameras is really pretty dumb. It’s “if/then” programming. If it sees a hand up, it starts tracking. That’s it.
Toggling one or more of the gesture controls lets you used a raised hand to identify a subject for auto-tracking, another gesture to turn on recording, and another gesture to zoom the camera in or out. But if you have the auto-tracking gesture control turned on and are filming a conference or lecture in a school classroom, and someone raises their hand to ask a question, the camera is going to start auto-tracking, whether you want it to or not. The ability to turn off specific gesture controls for situations when you want to manually control the cameras is a welcome feature.
Similarly, you can turn off the built-in microphone if you’re using other microphones. In the Audio Settings (see Figure 9), you can see if the camera is getting good audio from the built-in microphones. Options include Automatic Gain and built-in noise reduction.
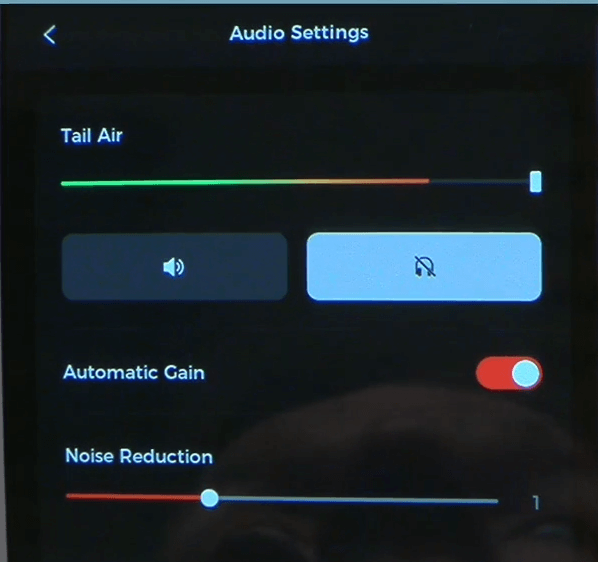
Figure 9. Built-in mic audio settings
You can also adjust camera gain settings, which have upper and lower limits so you can prevent the image from getting too grainy. But if you’re shooting in a low-light situation, you have up to 6,400 ISO in this camera.
In the Output menu, you have UVC mode, NDI mode, RTSP mode, and Media Settings for recording. There are a lot of different ways to connect to the camera, including via Wi-Fi over the LAN. The OBSBOT can create its own Wi-Fi hotspot so you can connect directly to it if there’s no Wi-Fi in the area. You can connect directly via HDMI out to your computer or use a USB-to-Ethernet adapter. And you have direct UVC mode, which means you’re connecting to it as a web camera. All in all, that’s five different ways that you can connect to the OBSBOT Tail Air.
This tiny camera also has a built-in MicroSD card slot that enables you to record at 4K the entire time you’re shooting, even if you’re delivering 1080p. This means you can go back and fix a shot that you may have missed if you were punched in during a live shoot because you have the recording as a backup.
The Tail Air’s NDI mode requires an additional activation fee of $100 per camera. The OBSBOT is an NDI|HX3 device, so it can do NDI encoding using H.264 or H.265. For bitrate, you can choose between low, medium, and high. After you enable NDI, the camera’s webcam, RTMP, and HDMI connections will no longer be available. I consider that a pretty steep limitation. Why I should lose HDMI out when switching from one encoding mode to another?
In the video that accompanies this review, I show the process of unboxing the third camera, getting it set up and on my network, and integrating it into vMix so I can have all three cameras ready and tracking me as I stand and present (see Figure 10). It demonstrates how simple the process is. All three cameras can function wirelessly: Walk into a room, set them down, assign some presets, and you’re ready to go.

Figure 10. Demonstrating the OBSBOT Tail Air’s wireless integration with vMix
There is yet another way to control OBSBOT Tail Air. In addition to being able to control these cameras from the software using NDI, using hand gestures, or running the software on a tablet, you can also use a physical RF remote that OBSBOT sells for an additional $79 (see Figure 11). After pairing it with your cameras, you can pan, tilt, zoom, turn on tracking, and more.

Figure 11. OBSBOT Tail Air Smart Remote Controller
The Tail Air Smart Remote Controller is a very interesting unit with some very peculiar features. One side looks like it’s designed to connect to something else via bracket slots, although I haven’t seen any documentation to indicate what that might be. On the bracket side is the USB-C for charging. On the opposite side is the power button, and the camera zoom control is at the top. The three camera buttons across the bottom will light up white when the camera is available and green when the camera is selected. (In Figure 11, I have the remote paired with two of the three cameras submitted for review, so you can see Camera 2 available and Camera 1 selected.) For each camera, you have three different preset position buttons (P1, P2, P3, just as in the app). There are also buttons for human tracking, animal tracking, focus, multiview, and recording.
At the top of the remote is the activity indicator, which tells you when it’s transmitting. There’s also a power button to turn on the camera you’ve selected. Even while the remote is switched off, it will still show which cameras are available. When you select a camera and push one of the preset buttons, the RF light does not come on until you turn the remote on. Then, the RF light blinks when you press buttons to control the camera. Using the remote, you can switch cameras and click a preset position much faster than trying to switch cameras and click a preset using the app on a tablet. Also, it’s much easier to follow a subject moving from side to side using the joystick on the remote than trying to do it on a screen.
Power over Ethernet
Another accessory that is part of this ecosystem is a Power over Ethernet (PoE) adapter. This adapter has a short stubby part that Ethernet can plug into, with an additional USB-C above that comes in handy if your network cable does not have power. There is also a 6-foot cable with USB-C that plugs into the OBSBOT Tail Air and will charge the camera battery, keep the camera powered, and also carry data back and forth for streaming or NDI. It works standard for any Ethernet—just plug it in, and you’re good to go. This way, your devices can stay wired, which saves you from having to worry about wireless RF issues.
I have done live productions in venues where video over Wi-Fi was generally unreliable, so the option to use wired camera connections for power, control, and video is welcome and necessary. But keep in mind that the USB-C can be used just for power and that the Tail Air has a micro-HDMI port as well.
The last accessory is an extended base that offers 360-degree panning, because the Tail Air, like most PTZ cameras, can only turn so far. They stop at a certain point, which means they can’t continually follow someone around and around. If you’re shooting sports, particularly water sports, skateboarding, cycling, or any other activity where you need to follow someone all the way around, a 360-degree base that can keep rotating will come in very handy. Plus, it uses the contacts under the base of the camera to provide up to 7 hours of additional power.
Conclusion
If you’re in need of a lightweight PTZ camera system that doesn’t require a long zoom, the Tail Air kit is well worth a look. As a small, lightweight, portable, battery-operated PTZ camera system with multiple control options, the Tail Air has some definite advantages.
If you need anything longer than a 4x zoom or crop, the Tail Air system is not designed for those types of shoots, and you’ll be better off with one of the many 20x and 30x PTZ systems available. But for a small performance stage, conference room, podcast table, demonstration kitchen, instruction classroom, or any number of setups where the cameras can be positioned close to the subjects and you would really benefit from the ability to manually change the shot or leverage automatic tracking, the OBSBOT Tail Air is custom-tailored to your needs.